MATERIALS:
Socks, etc.
Socks come in all shapes, sizes,
fiber contents and prints. Within one size (e.g., ladies 9-11)
there is a huge difference in the size of the socks both in width
and length. Thus, the size of the sock - and the print on it
- will determine which doll the sweater can be made for. Consider
taking the pattern pieces with you when looking for socks - that
way you will know if you can actually fit the pieces on a particular
sock!

These socks are all a ladies size 9-11
Fiber contents can vary from
wool, angora, cashmere, cotton or acrylic. And as you can see
from the picture above, the designs are incredible. Everything
from wee little creatures, to aran knits to ski sweater designs!
Designs - there are one-way (distinct
top and bottom to the design-like the reindeer and snowman designs
above) and two-way designs. This will also determine how you
can use the sock. Some designs must absolutely face up toward
the neckline of the sweater - and on others you can place the
top of the sweater piece either up or down on the sock. A one-way
design can severely limit your options in the layout so look
carefully when choosing these socks to be sure the pieces will
fit.
Another design pattern that will cause some limitation is when
the print on the sock doesn't cover the entire bottom part of
the sock (see 4th sock from the left). I usually cut the sleeves
from the bottom part of the sock and if the sleeve is a wide
one (e.g., for 18" dolls), it might "look funny"
without the pattern going around the entire sleeve.
Children's size socks can be
used for tiny Betsy, Kripplebush kids (you will use both socks
in the pair) and sometimes the 10" size sweaters.
Note: People sweaters can also be cut up to make wonderful
doll sweaters. Use the pattern pieces and assembly instructions
from any of the patterns.
Ribbing
Again, there are several choices.
You can purchase by-the-yard (this is actually sold "by-the-inch"
as you can buy any number of inches you desire) ribbing from
the fabric store. Fiber content can vary here too. Some ribbings
are 100" cotton or cotton/polyester, but there are some
that contain a small percentage of lycra (which helps shape retention-I
found this ribbing at Hancock Fabrics). The cotton/lycra ribbing
is slightly more expensive than the 100% cotton kind, but is
well worth it. Also consider cotton or synthetic "t-shirt"
knits that are ribbed - many times these work well and provide
a wider color selection. Parts of the sock can also be used (after
you cut out the main pieces) for ribbing - the cuffs and the
toe or heel parts will work for neck/bottom and sleeve cuff ribbing.
I have even used a portion of the sock itself for ribbing - if
there is a section of solid color I can cut this from. This is
a great choice when you want an exact color match. Additional
ribbing alternatives are cotton/lycra or nylon/lycra fabric (what
leotards are made of), specialty metallic knit fabrics or a solid
color sock.
Cut by-the-yard ribbing with
a rotary cutter. It's much easier to get straight, accurate pieces
with a cutter and ruler combination than with scissors.
If the sock design allows it,
consider cutting the sweater front and back out leaving the cuff
on to become the bottom ribbing. Place the pattern piece along
the fold and allow extra room at the bottom (the overall length
of the sweater) to include what the ribbing would add.
Note: There are separate pattern pieces in
the 16", 18" & 21" fashion doll pattern for
this.
Lining
Use a lightweight lining that
stretches so that the softness, stretch and fit of the sock material
are not lost. There are several choices that all provide a nice
lining.
1)
Nylon tricot (like slips are made of) - this fabric is reasonably
priced, wide (60-108") and easy to work with. It stretches
across the width of the fabric, but there is virtually no stretch
along the length (this aspect does help to stabilize the knit
when sewing the side seams).
2)
Powermesh (80% nylon, 20% lycra) - this fabric is a tiny mesh
weave fabric with high lycra content. I use it for the fashion
doll sweaters as they are a closer fit and the Powermesh is lighter
weight than tricot and stretches as much as the sock material.
However, it is a bit trickier to work with because of the "holes"
and the high lycra content.
Note: I do sell some of the powermesh here
on my website (http://www.dalerae.com/sewsup.htm).
If you are unfamiliar with this fabric, the Tonner company has
used it for Tyler's hosiery and to line many of her outfits.
3)
Swimsuit lining - this is usually a nylon/lycra fiber content
and works well.
4)
Light-weight t-shirt type or synthetic knit - I have used this
when I couldn't find another suitable color match (the color
match is important for the tiny Betsy and Kripplebush Kid sweaters).
CUTTING INFORMATION:
Sweaters
Each sock design - combined with
the size of sweater chosen - will determine how the sweater is
cut out. The patterns include some "basic" layout instructions,
but the variety of possibilities is endless! If the fit of the
pattern pieces on the sock is tight, buy two pair of socks to
make sweaters for two different size dolls and combine sizes
to get the pieces to fit (e.g., on one sock place the front of
the 14" size on the top of the sock and the sleeve of the
10" size on the bottom, etc.)
Consider cutting the pattern
pieces out full-size (e.g., the entire sleeve) and out of a sheer
paper so that you can place it around the sock to see where the
design will end up on the sweater.
On the fashion doll patterns
place a mark on the front pattern piece indicating where the
bust point is so that you don't inadvertently place an undesirable
design there!
Lining
Why line these sweaters? There are several reasons.
- The inside of the socks has
a multitude of loose threads from the woven design. These threads
are cut when cutting out the sweater pieces - they could unravel
when dressing the doll AND the doll's little fingers easily catch
on these threads when putting the sweater on!
- For the tiny Betsy and Kripplebush
size, the lining finishes off the sleeve bottom and neck/center
back edges. The lining thus eliminates the seam bulk that would
result if ribbing were added to the neck and sleeve bottom edges.
- The lining stabilizes the sock
knit (which is VERY spongy and stretchy) making it easier to
work with.
The lining should have the greatest
amount of stretch going around the body - the least amount of
stretch should go lengthwise.
The lining for the tiny Betsy
and Kripplebush sizes is cut out using the basic pattern pieces.
When working with the larger
sizes (which use ribbing to finish the neck, sleeve bottom and
sweater bottom), cut out the sweater pieces and glue each piece
(using a thick tacky glue and placing little dots of glue around
the perimeter of each piece within the ¼" seam allowance),
wrong sides together, to a large piece of lining. When the glue
is dry, cut around all of the sweater pieces. (See pictures below).
After placing the pieces onto
the lining, gently press down on each piece for a few seconds
with a warm iron to "set" the glue.
***WARNING! - When working with acrylic socks, be
very careful of the heat setting on your iron. Use only a warm
setting and no steam - the sock "fabric" shrinks very
easily! Consider using a Teflon ironing piece under the lining
when gluing on the sweater pieces (if you are working on your
ironing board). This will protect the ironing board cover so
glue does not get on it.
Note: The Teflon sheets are sold in quilting
departments (of a fabric store or sewing supply catalog) and
are used for appliqué work to prevent the fusible interfacing
from getting all over the ironing board cover.
CONSTRUCTION INFORMATION:
Seams
- If possible, set the presser
foot pressure at a minimum setting (e.g., on my machine, a setting
of 4 is normal - for the sock sweaters, I change the setting
to slightly less than 1).
- Use a ball-point or universal
point, size 11, sewing machine needle.
- Sometimes it helps to pin the
pieces together for sewing with the pins perpendicular to the
seam line - and CAREFULLY sew over the pins. The machine seems
to "grab" the pins and move the seam along without
stretching it as much. Also, you can "push" the seam
thru by holding onto the pin and helping the fabric feed under
the presser foot.
- The seams can be sewn in different
ways:
-You can use a serger to sew and finish the seams at the same
time (if your serger has an adjustment for presser foot pressure,
move it to the lowest setting).
-You can sew a straight stitch at the ¼" seam line,
trim the seam to 1/8", then zig-zag over the edge. Note: You do not need to use a very short zig-zag
stitch to do this as the fabric really does not ravel away. In
fact, a short stitch creates a thread build up causing a bulky
seam.
-You can sew one line of straight stitching at the ¼"
seam; then sew a second row of straight stitching 1/8" from
the first one and trim off the excess seam allowance.
Specific information
for tiny Betsy and Kripplebush sweaters:
- Because the tolerances are less
flexible on these sweaters than on the larger ones, and the small
pieces are sometimes harder to work with, there are a few different
construction techniques to follow.
- When sewing the lining to the
sweater, or stitching the casing line at the bottom of the sleeves,
the pieces feed easier if the lining is on top and the sweater
fabric is on the bottom.
- When putting the sweater together:
Stitch lining to sweater body at center backs and around neck
edge - taking approximately a 1/8" seam allowance around
the neck edge and ¼" seam on center backs.
- Trim seam allowance off corners
and clip around neck edge.
- Turn so wrong sides are together
- press and glue lining to sweater body (placing glue dots within
¼" seam allowance) around side, armhole and bottom
seam edges. Trim edges to make them uniform.
Sleeves:
Stitch lining to sleeve at bottom edge with a 1/8" seam
allowance. Turn so wrong sides are together - glue lining to
sleeve around edges (placing glue dots within the ¼"
seam allowance). Trim edges so they are uniform. Stitch casing
line along bottom of sleeve, approximately 1/8" from bottom
edge.
Elastic at the bottom of
sleeves:
1)
Mark the length required, measuring from the end of the elastic
- however, do not cut off the elastic at this mark.
2)
Thread the loop turner thru the casing.
3)
Place the end of the elastic on the hook - approximately 1/8"
into the length of elastic (note-you need to catch enough of
the end of the elastic on the hook so the elastic doesn't unravel
as you pull it thru the casing).
4)
Pull elastic thru casing and align the end with the side of the
sleeve casing. Anchor it here with a quick hand stitch or a pin.
5)
Pull up the elastic until your mark shows at the opposite end
of the casing and align the end of the casing with the mark on
the elastic - anchor the elastic at this side of the casing with
a quick hand stitch or pin.
6)
Cut off elastic at the mark.
****When working
with the short sleeves, it is easier to sew the sleeve into the
armhole before you insert the elastic into the bottom of the
sleeve.
General information for
all sizes:
- When using the sock cuff for
ribbing, take the height measurement given in the pattern instructions
and divide it in half to get the measurement needed. The length
will remain the same.
- If you encounter some curling
of the cuff cut edges after cutting to size, place some small
dots of glue along the cut edge and press together before attaching
to the sweater.
- For a variation
in sleeve styles for pattern P1021, use the adjusted sleeve pattern pieces for the
8", 10", 14" and 18" little girl dolls that
are designed for an eased cap instead of a gathered one. To print
out these alternate sleeves, click HERE,
then click on the thumbnail picture of the sleeves (you will
need Adobe Acrobat for this). Once the page comes up in Acrobat
it will be the correct size to print out on an 8-1/2 x 11"
piece of paper.
- On the 10", 14" &
18" sizes (little girl dolls), the sleeve is gathered at
the bottom to fit the ribbing instead of stretching the ribbing
as you sew it on (like you would do on a "people" sweatshirt).
The reason for this is that if the ribbing is stretched enough
to fit the sleeve, it is distorted and it's difficult to control
the size of the ribbing (in other words, if you want the ribbing
to finish up 3/8" all across the sleeve bottom, it might
be ¼" in some places and ½" in others).
It is just hard to hang on to and stretch such a little piece
of ribbing as you sew it on!
GENERAL SLEEVE INFORMATION:
Note: This section is included to help you
with sewing in different styles of sleeves. On the little girl
sock sweaters, the sleeve cap is either gathered or sewn in with
an eased cap (using the alternate sleeve pattern I've provided
above). However, either way, the sleeves are drafted with a flatter,
easier-to-sew, sleeve cap. The fashion doll pattern has a high
cap that must be eased into the armhole - this allows for a closer
fit. These sleeves can be a bit more challenging to set in.
Gathered Cap Sleeve:
- Using a long stitch length,
stitch 2 rows of stitching. One line of stitching will be just
inside the seam line (1/4" from the cut edge) and one will
be just outside.
- Pull up the threads to create
nice, even gathers. Stitch sleeve into armhole.
Eased Cap Sleeve:
- Using a long stitch length,
stitch only one row of stitching just barely inside the seam
line.
- Pull up the thread to take up
the fullness so it will fit into the armhole - however, make
sure that there are no gathers present. Stitch sleeve into armhole.
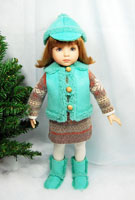
SWEATER EMBELLISHMENTS:
As a finishing touch, a little extra addition can make the sweater
really special! Add a bow, button, bell, fur collar & cuffs
or any other cute decorations to the sweaters. A beading design
can look lovely on the fashion dolls. And don't forget about
accessories like hair ribbons, baskets or other holiday items.
A FEW SOURCES:
Socks
Target - www.target.com
Kohls - www.kohls.com
Department stores
"Discount" stores like T.J. Maxx, Marshall's, etc.
Dollar Stores
Catalogs
Ebay!
Sewing/doll Supplies:
Dale Rae Designs - www.dalerae.com - 877.490.3716
Clotilde - www.clotilde.com - 800.772.2891
Home Sew - www.homesew.com - 800.344.4739
Newark Dressmaker Supply, Inc. - www.newarkdress.com - 800.736.5783
Tallina's - www.dollsupply.com - 800.257.9450
Mini-Magic, Inc. - www.mini-magic.com - 888.391.0691
The Fabric Club - www.fabricclub.com - 800.322.2582
Published Article
"Doll Couture - Sew Fun!" by Dale Rae
http://www.dollsandfriends.com/article-current.html
|