General
Notes on making the costumes:
Pattern:
I began with a pattern
from the book "Patterns for Theatrical Costumes"
by Katherine Strand Holkeboer
(This book has actual costume patterns for both men and
women ranging from the ancient Egypt time period to 1915).
The patterns are on 8-1/2" x 11" pages so they must
be enlarged - even for most doll sizes.
The book contains full instructions on how to enlarge the patterns
for human (or elf, hobbit, wizard, etc.!) size using a grid system
- as well as some basic fitting information
and other very useful costume stuff. I highly recommend it.
For a doll size pattern I scanned the page and saved it on my
hard drive -
then enlarged it to the size I wanted using a photo editing program.
Tutorials:
How to enlarge/shrink a pattern (either from a book like
this or from pattern envelope/instruction pattern piece pictures)
Click
here
Basic measuring/fitting information
Click
here
Note: There are several non-princess seam Medieval-type
gown patterns in this book.
I chose a Kirtle gown pattern from the late 15th Century (pg.
156-57 in the book)
and I changed the neckline from a square one to a rounded one.
This is a princess seamed gown and I chose to use
it for several personal reasons........
1) I like the fit that I can get from a princess seamed garment
(especially around the bust line
and waist). People who buy fashion dolls/outfits desire close-fitting
garments and even
though the "real" Arwen's gowns fall close to her body
without princess seams,
this won't necessarily happen on a doll using a pattern similar
to what was used for Liv Tyler because....
There just isn't enough fabric weight in the garment (due to
the small size)
to create the draping that happens on a human.
(This is why I like to use the stretch velvet - the knit has
more weight than
woven velvet so it creates a nice draping around the doll's body).
2) Along with the close fit around the waist, I like lots of
fabric around the bottom of the
costume so that I can drape the hem in such a way to create the
illusion of movement
(to me part of the beauty of the LOTR female costumes is the
way they move -
in the wind, when walking, etc. When a garment is placed on a
doll it remains static.)
And since I knew I was going to be using velvet for 3 of the
costumes, I wanted to have
pattern pieces that would follow a straight grainline. I also
did not want each piece to
have such a huge flare at the bottom. When there is too much
breadth at the bottom of
the garment (e.g., if a full circle is cut all in one piece)
there are areas where the velvet nap
doesn't look as "rich" because the nap actually ends
up going in various directions.
After enlarging the pattern to fit the doll, I cut out a "mock-up"
of a knit fabric that had a stretch
and draping quality closely matching the stretch velvet I was
using for the actual garment.
Note: Whenever I do a mock-up garment I try to use
a fabric that will react closely
to the actual fabric I will be using for the final garment (e.g.
an inexpensive knit if I'm going to
be using a knit velvet, an inexpensive satin/taffeta if I am
going to be making the final
garment out of a satin or taffeta, etc.). I do this instead of
using muslin - purely
a personal preference as I have had problems using muslin for
the mock-up when it
doesn't have the same qualities as the fabric I am going to use
for the final item.
I knew I would be using a knit for all of these costumes - and
knit fabrics
require a different fit than a woven. When working on doll clothes,
the tolerances
for error or a mis-fit are very small - 1/16" off on each
seam can cause the
garment to fit very poorly. Once the mock-up was fitted to the
doll I marked all
of the seam lines and took it apart to create a pattern.
Trims:
Finding trims in proper scale for doll costumes is
always a challenge -
and these came from many different sources.
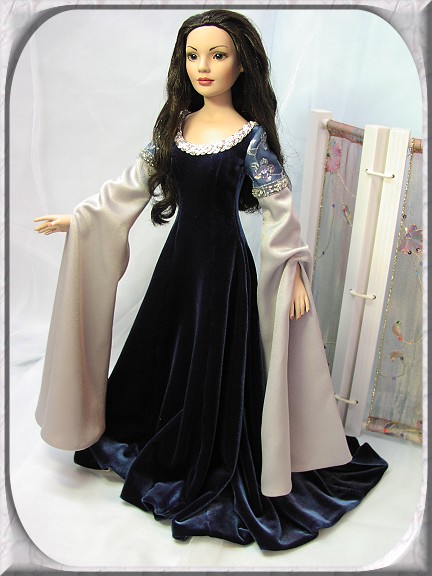
*The braided trim (it is coiled metal and comes from India) around
the neckline of
the Requiem & Dying dress came from a seller on Ebay - HeritageTrading
The beaded ribbon trim on the sleeves of the Mourning dress is
also from this seller-
I added cream pearl strand trim above and below the ribbon.
*The various other trims came from my "stash":
-The sheer sequin/beaded upper sleeves of the Requiem gown is
a beaded organza fabric-
it was a pale grey color. I used a Prisma pen to color the fabric
(and the doll's eyes) blue .
-I found the beaded ribbon in a bridal section of a fabric shop
in Colorado-
it is narrow (3/8") and was perfect for the Requiem upper
sleeve band.
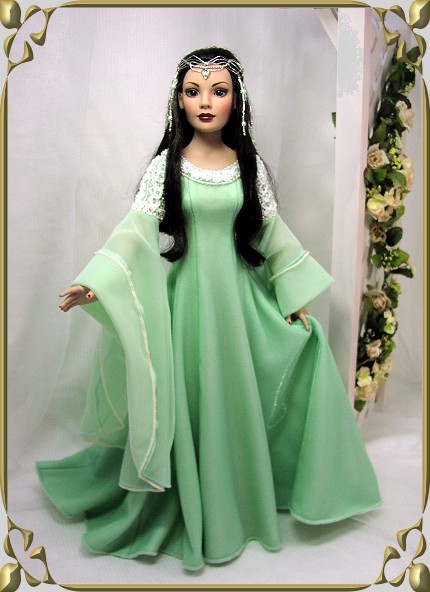
-The white trim on the Coronation gown upper sleeves was a combination
of four different trims.
The two vertical trims were made up of cording and pearls - I
added pale yellow
beading in between the circles and around the trim. The iridescent
pearl trim comes as
a strand and can be bought by the yard (it's the same as the
cream pearl trim I used
on the Mourning gown) - this was placed in a line between the
corded trims.
I edged the bottom of the upper sleeves with yet another cord/pearl
trim that
has a "wave" design and accented it with the pale yellow
beads.
The neckline trim was the same as the trim used on the center
of the upper sleeves -
with yellow beads added and the pearl strand placed above and
below the trim.
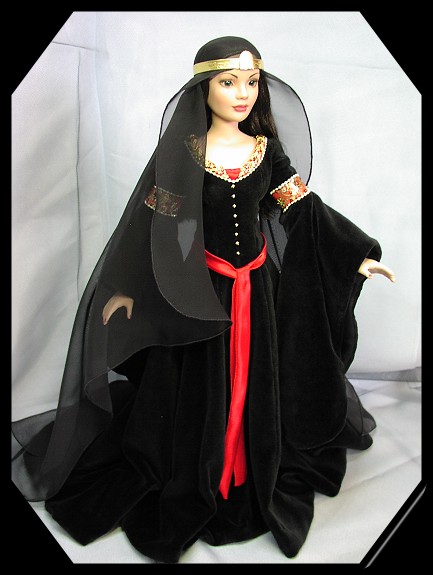
-Gold "buttons" down the front of the Mourning gown
are small gold beads.
-Mourning gown neckline trim is a red/gold braid with a cream
pearl strand added below it.
I placed the red satin "V" over the trim and hand stitched
it in place.
Construction details:
*Dresses are completely lined with nude tricot. This fabric was
used because it is a knit (to work
with the knit velvet) and also because colors from fabrics tend
to leach into the doll vinyl
and leave stains. The nude lining provides a neutral color resting
against the doll.
I completely machine-stitched the lining to the dress along the
hemline (leaving a 4" opening in the
center back lining seam for turning) - making the lining 1/4"
shorter than the dress.
This allowed for a lovely "drapy" hem without any sort
of hem stitching showing.
*All seam allowances are 1/4" - anything larger is hard
to work with on the small pattern pieces.
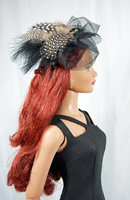
*Coronation headpiece was made using silver wire, a jewelry piece
(for the back) and lot of beads!
I drew out a template of the design on paper and placed this
on a small cork bulletin board - placing a row of pins along
the design lines. I then bent the wire along the pins/lines to
get the shape I wanted.
Small pieces of wire were bent around crucial points to hold
the crown curved wires together -
and jewelry glue was used to reinforce these places.
*Mourning gown "crown" was made from Art Emboss light brass color sheet (bought at Michael's). I used the embossing
stick that comes with this to "etch" the design details.
I cut a strip 3 times the width I wanted - etched a line down
the length in two places
and folded each over so that the band part is actually 3 thicknesses.
For the front piece
I cut the shape out of cardboard - then out of the metal sheet
(with an extension
added all around). I etched the piece with the "Gondor design"
and glued the metal to the
cardboard, clipped the extension every 1/4" or so all around,
and bent the extension pieces to the back of the cardboard. The
cardboard area was painted on the back (to blend the color) and
the piece was glued to the front of the band.
The veil is black chiffon cut in a rectangle with curved corners
- edged with a
tiny machine zig-zag stitch. I folded a 1/2" hem, hand basted
the hem in place and stitched
the zig-zag along the folded edge. The excess hem was trimmed
away - carefully -
with small curved scissors! The veil is held in place with the
headpiece.
*Sleeves:
Coronation gown: Fitted upper sleeve with 1/2 circle cut used
on the lower sleeve-
made of two layers of chiffon (green and cream/ecru)
that have a rolled-hem stitch around outer edge (done on a serger).
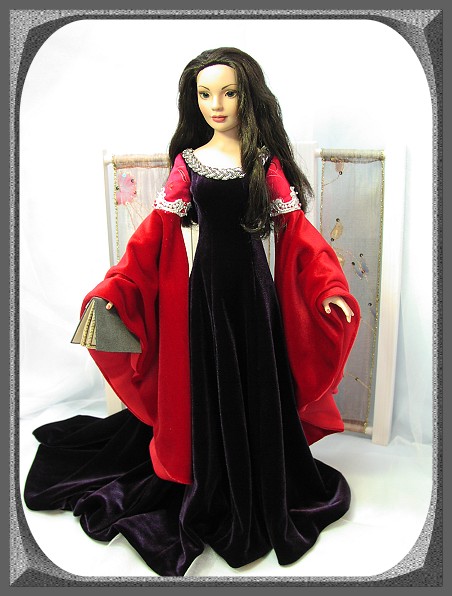
Requiem gown: self fabric-lined lower sleeves, tube shaped with
a flare at
the bottom, slit up the front (elastic tacked to the inside of
sleeve at the
top of the slit to hold it onto the doll's wrist).
Mourning & Dying dress: lower sleeves are the 1/2 circle
cut again, both fully lined.
The Dying dress sleeve also has a piece of elastic attached to
the inside of the sleeve
to hold it in place at the doll's wrist so the sleeve can drape
nicely on the doll's arm.
ELF EARS
Elf ears were put onto the Coronation Gown Arwen doll using a product that is made for model airplane/car hobbyists -
Squadron White Putty. It comes in a tube, air dries hard and can be sanded. I simply used a toothpick to build the
elf ear shape onto the top of the doll's ears - using pictures of Arwen's ears from the movies as a guide. I then
sanded the addition and painted (using acrylic paint) the whole ear to blend in with the color of the vinyl.